
What Is Oracle Single Sign-On (SSO)?
Oracle Single Sign-On (SSO) is a functionality built into Oracle Cloud. This enterprise cloud offers various tools to extend and create new services rapidly. It delivers business applications on an integrated development and deployment platform and includes built-in identity management.
Here are key Oracle Cloud identity features:
- Vanity URLs—a customized web address branded for marketing purposes and helping users remember and locate specific web pages. It enables organizations to use a vanity URL instead of the Oracle Cloud URL.
- Oracle SSO—enables users to log in to one domain and access various other domains. It provides access to several domains through one log-in process to improve security and the user experience.
- Authorization—employs the OAuth 2.0 authorization framework to integrate services. It provides limited access to applications or services through a protected HTTP resource.
How Oracle SSO Login Works
Oracle Cloud SSO offers a backup mechanism, which ensures that you can still log in to your identity domain if there is an issue with SSO operations. You can bypass the SSO identity provider by logging in directly and addressing the issues.
If you enable SSO in Oracle, you provide users with the following advantages:
- Users don’t have to remember different passwords or manage different cloud and on-premise accounts separately.
- Users are more motivated to implement secure passwords with just one password to maintain, such as using long and unique character sequences and maintaining confidentiality.
- There are fewer failed login attempts, resulting in fewer incidents where users have to reset their passwords.
- Users have a smoother, easier sign-in experience and save time.
- SSO consolidates authentication and authorization via a centralized platform.
With SSO enabled, authentication for Oracle Cloud services becomes the responsibility of the identity provider.
Here is the end-user process for signing in to a service in Oracle Cloud with federated SSO enabled:
- Go to the login page in Oracle Cloud and select Sign in with your company ID. The page redirects you to the identity provider for authentication.
- Oracle Cloud (the service provider) creates and encodes a SAML authentication request, embedding it in a URL together with the encoded Oracle Cloud URL and information about the state.
- Oracle Cloud uses the SSO URL to forward a redirect message to the browser. The URL then redirects the browser to the identity provider.
- The identity provider extracts and decodes the information contained in the URL, prompting you to enter credentials. Once you’ve provided the correct credentials, it authenticates you.
- The identity provider creates a SAML response with your username, which includes the identity provider’s digitally signed private and public keys. It encodes the response and the state information and sends it back to the browser.
- The browser receives the response and forwards it to Oracle Cloud.
- Oracle Cloud uses the identity provider’s keys to verify the SAML response and redirects the browser to the target URL.
- The browser logs you into Oracle Cloud and redirects you to your target service.
Related content: Read our guide to Oracle IAM (coming soon)
Tutorial: Configuring Oracle Cloud SSO
Here are the main steps you need to take to configure SSO for Oracle Cloud services:
Step 1: Set Oracle Cloud as Your Service Provider
Before you can configure SSO, you need to set Oracle Cloud as your service provider.
Use the following process to set up SAML 2.0 single sign-on between your identity provider and the Oracle Cloud-as-service provider:
- Navigate to the dashboard on the My Services page and select Users.
- Click on SSO Configuration.
- Select Configure SSO.
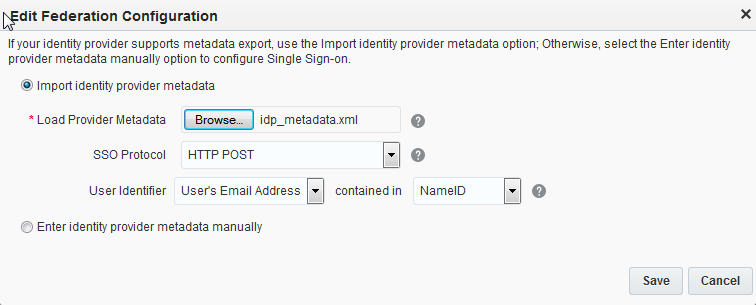
- Specify if you want to import metadata from the identity provider metadata. Alternatively, you can manually type in the metadata if your provider doesn’t allow you to export metadata.
- If you choose to import metadata, you can click on Import Identity Provider metadata and select Choose File to upload the file containing your identity provider metadata file (e.g., idp_metadata.xml).
- HTTP POST is the default (and recommended) option in the SSO Protocol field, which determines the SAML binding used to transfer the data. HTTP POST specifies the transportation of SAML protocol messages using the base64-encoded form control content in HTML forms. The HTTP Artifact is another option supported by Oracle, which defines the transportation of references (artifacts) to SAML requests or responses over HTTP. Artifacts represent complete SAML assertions compactly and can be query string parameters embedded in URLs.
- Next, select User Identifier to specify the Oracle LDAP directory attribute used to map the SSO and user data from the incoming SAML assertion to Oracle Cloud users. Although the email option is preferable, you can select the user’s ID or email address.
- Finally, select contained in and ensure that the field is set to NameID if you’ve chosen the user email address as the user identifier. When done, click Save.

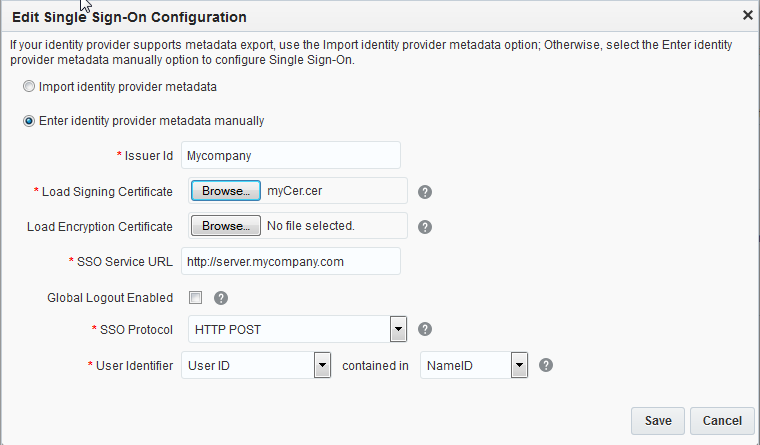
If the identity provider does not support metadata exports, you must enter the metadata manually. In this case, you also need to provide the SSO Service URL and Issuer ID, specifying if you want to enable global logout. You also need to provide the identity provider’s signing and encryption certificates.

Step 2: Configure the Identity Provider
Once you’ve set up Oracle Cloud as the service provider, you need to configure the identity provider on the SSO configuration page:
- Navigate to Users and click on SSO Configuration to open the configuration page. Scroll down to the section called Configure your identity provider information.
- Your identity provider configuration requirements depend on whether the identity provider can import metadata:
- If it can import metadata, select Export Metadata and then Provider Metadata to export your metadata from the service provider and import it into the identity provider. Save the imported metadata to a local SP_metadat.xml file.
- If not, copy-paste the URLs and provider ID into a SAML 2.0 file that the identity provider can use. Download the service provider’s certificates.
- Use the configuration interface to set up the identity provider. Each provider will have a different set of steps.
Step 3: Test the SSO Functionality
Identify configuration issues by testing and verifying the performance of your Oracle SSO:
- Navigate to Users and select SSO Configuration.
- Select Test under Test your SSO on the configuration page. It should redirect you to the Initiate Federation SSO page.
- Click on Start SSO to trigger federation SSO. The workflow should redirect you to the login page of your identity provider and present an authentication challenge.
- Sign in as admin to view the results of the federation SSO on the Test SSO page.
- If the test is successful, you can enable SSO. If unsuccessful, you should review the test results to identify the source of the issue.
Step 4: Enable SSO
You must explicitly enable SSO to allow users to sign in with their established identities and credentials.
- Go to Enabling SSO.
- Once you’ve enabled SSO, go to Sign In to Oracle Cloud and select Sign in using your company ID to enable authentication via the identity provider.
- Go back to the Users page and select SSO Configuration. Check the status of the Enable SSO field. If the status reads SSO is Not Enabled, switch it to Enable SSO to enable single sign-on across Oracle Cloud services. SSO will not be enabled if you do not do this.
- If you want to disable SSO, you can do so at any time via the Enable SSO section on the configuration page.
Step 5: Enable Sign-In with Identity Domain Credentials
With SSO, users most often use their credentials from the identity provider to sign in to services. You can also enable SSO using Oracle Cloud identity domain credentials, although this is not the default. Most administrators prefer to require users to log in with their identity provider credentials. However, the identity domain-based approach is more convenient when using various Oracle services.
If you choose to allow your users to sign in with identity domain credentials, you can enable this option with the following process:
- Navigate to Users and select the SSO Configuration tab.
- Go to Enable Sign-In to Oracle Cloud Services with Identity Domain credentials and select Enable.
- A window will appear confirming that SSO with identity domain credentials is enabled. It will notify you that users with credentials associated with their identity domains (i.e., administrators) can sign in to services in Oracle Cloud via their identity domain or identity provider credentials.
Schedule a demo with Pathlock’s Oracle ERP specialists to learn how you can simplify the implementation of SSO across your Oracle applications.
